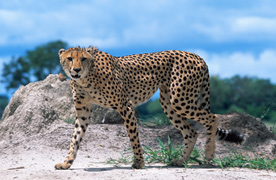
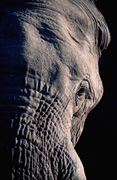
Wildlife and Safari Photography Tips
Page 1 of 2
The advent of digital photography has resulted in many more amateur photographers than ever before and today anyone with a smart phone has a camera with them most of the time. That said, most people are aware that a camera phone or an inexpensive point-and-shoot is not going to give them the quality images they are hoping to get on a nature or wildlife-based travel adventure.
The camera market is also flooded with an abundance of models, some with removable lenses, some with built-in zoom lenses, some big and heavy, some easy to carry and light-weight, some uber-expensive and some very affordable, but which one should you choose? The question really is which camera will be best for your trip and hopefully also be something you reach for often after you get home or at least on future trips.
Below are a few things to consider when choosing which photographic equipment to bring on your trip and we hope it will assist you in making decisions about new purchases.
Shortcut
to African Safari Photos: Click
the shortcut link to go straight to our African safari photos.
EXCLUSIVE
Check out our new Digital
Photography Safari Workshops
On
this page, James offers his personal advice and ideas for
anyone wanting to come home with the best possible images from their wildlife adventure.
BASIC
EQUIPMENT
 Camera: I strongly encourage anyone interested in taking quality wildlife or landscape images on a wildlife or nature travel adventure to invest in a digital SLR (single lens reflex) camera. I do not recommend point-and-shoot cameras as a primary camera for a photo adventure, but having a small, less expensive camera in your pocket throughout any type of travel, is a good idea for those times when carrying your SLR is not practical. Moreover, many of the new “all-in-one” (ie, no removable lens) digital cameras have ever-improving zoom lenses and sensors allowing these cameras to capture superb images. Camera: I strongly encourage anyone interested in taking quality wildlife or landscape images on a wildlife or nature travel adventure to invest in a digital SLR (single lens reflex) camera. I do not recommend point-and-shoot cameras as a primary camera for a photo adventure, but having a small, less expensive camera in your pocket throughout any type of travel, is a good idea for those times when carrying your SLR is not practical. Moreover, many of the new “all-in-one” (ie, no removable lens) digital cameras have ever-improving zoom lenses and sensors allowing these cameras to capture superb images.
My next suggestion may be impractical for most, but here it is anyway: bring two cameras. If you have any backup camera, it provides insurance against something tragic happening to your primary camera. The optimal situation is to have two good cameras - put a lens on each and use them both!. |
 GO
TO PAGE 2 GO
TO PAGE 2
(James' Equipment and James'
Software)
(Video
on Safari)
Lenses: Here is an approximation of the percentage of images I have made with various focal lengths over the past ten to fifteen years:
 14-200mm:
35% 14-200mm:
35%
200-300mm: 25%
300-400mm: 25%
over 400mm: 15%
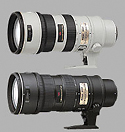
Keep in mind that I travel with quite a bit of heavy camera equipment and I am also a very keen “birder”. But having big, expensive, “pro” lenses is definitely not necessary to get most images. I carry my 600mm f/4 lens mainly for birds, but I capture most of my wildlife images using my two or three favorite zoom lenses. If you can get one, I suggest having a zoom that will provide up to 400mm of focal length with auto-focus capability. This will allow you to take advantage of virtually every photo opportunity on most wildlife-based trips. A 300mm lens will also suffice, but 400 is better. At the wide range of a zoom, getting down to an effective focal length of 17-24mm will be very useful for landscape images or images with subject matter in close proximity.
Be sure to read
the sections on: 1) image stabilization lenses; 2) image
magnification and Field of View Crop. |
Camera / Lens Purchases: One recommendation I make is that you spend your money first on a good lens and secondly on a camera. By this I mean that it’s slightly more important to have a quality lens than it is to have a quality camera. Cameras are really just a box that captures light. Of course, today’s cameras include software, different sizes and quality sensors, autofocus and metering systems, and other technology built in, but in the end, it’s really just a light-capturing box.
Lenses, on the other hand, vary significantly in quality based on the optics. The term optics describes the glass, which may be many different elements or lenses inside, all working together. The quality of a lens’ optics will vary depending upon the manufacturing process, the coatings used on the glass, etc. The point is that the quality of your images will be more affected by using “poor glass” (cheap lenses) than by using an inexpensive camera. In other words, if you put a $1500 lens on a $300 camera, you’ll likely get images of significantly superior quality to images taken with a $1500 camera and a $300 lens.
Furthermore, the pace of new camera introduction is far quicker than it is for new lenses. To illustrate this point, I used the same 300mm f/2.8 lens with 4 different cameras during a 10-year span on wildlife travel. Also, the quality of the digital sensors used today is so good, that using a high-quality lens is even more important than it ever was with a film camera. This is because lens aberrations are much more likely to be picked up by these sensitive digital sensors than by film emulsion, which was more “forgiving” in this sense..
Filters: Make sure you have screw-on filters attached to all of your lenses. You should use a daylight filter only, which blocks out UV light without changing the color of your images. In the “old days” (before digital), I used warming filters on my lenses, but today I shoot in “Raw mode” and leave my white balance setting on “Auto” almost all the time and then make any needed corrections to an image’s white balance using Camera Raw software. I recommend the UV or clear filter as protection for your lenses only. A scratch on the filter is relatively inexpensive compared to a scratch on your lens! Use filters!
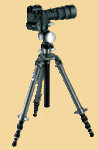 Camera
Support: I have taken many tens of thousands of images on my travels and my techniques for getting the best shots have changed slightly over the years. However, my main goal (and struggle) has always been the same - to find the most effective way of taking sharp, well exposed images. The main problem you will often face when shooting wildlife is finding the best way to steady your camera. The problem becomes more pronounced when using longer focal-length lenses. Camera
Support: I have taken many tens of thousands of images on my travels and my techniques for getting the best shots have changed slightly over the years. However, my main goal (and struggle) has always been the same - to find the most effective way of taking sharp, well exposed images. The main problem you will often face when shooting wildlife is finding the best way to steady your camera. The problem becomes more pronounced when using longer focal-length lenses.
I have used all conceivable techniques (I believe), including home-made mounts, tripods, ball heads, gimbals and bean bags - all in an attempt to provide a steady platform from which to shoot and this is especially difficult when shooting from a vehicle. Today, I use a good beanbag in most situations and this has proved to be the most flexible and effective stabilizer for me. A beanbag also allows me to quickly pick up and switch to fully hand-held methodology if my subject matter changes position quickly. If you have your camera tethered to a locking device such as a tripod, monopod, or gimble then you may miss shots while disconnecting your camera from it.
I encourage you to bring a beanbag and it can either be transported empty - you can fill it with sand when you arrive at your destination - or transport it filled with buckwheat - very lightweight.
Image Stabilization Lenses: If you’re considering purchasing a new lens, I would strongly advise you to consider one which offers image stabilization. There are numerous lenses covering a wide range of focal lengths available today which utilize image stabilization and they really do improve the quality of images.
The rule of thumb when hand-holding a camera (at least before the invention of image stabilization technology) is to use a shutter speed that is at least as fast as one over the focal length of the lens. For example, if you are trying to hand hold a camera with a 200mm lens, you will need to have the shutter speed set for 1/200 or faster in order to maintain sharp focus. Of course this assumes also that your subject matter is stationary.
Using an image-stabilized lens (Nikon calls their version Vibration Reduction) permits safe hand-holding (ie, no tripod or other support needed) at two full f/stops (Nikon claims three) slower shutter speeds than would otherwise be possible. What this really means is that some images which would otherwise turn out blurred or slightly out of focus can often be captured in perfect focus using these lenses. Two recommendations for an IS/VR lens on an African safari are the Nikon AF-S NIKKOR 80-400mm f/4.5-5.6G ED VR and the Canon EF 100-400mm f/4.5-5.6L IS USM. Neither is inexpensive, but both offer a wide range of focal length and are great if you want to bring just one lens.
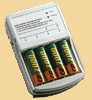 Batteries: Very important -- Do not miss those to-die-for images because your batteries have gone dead. I use rechargeable battery packs with my cameras and rechargeable AA’s with my flashes. Batteries: Very important -- Do not miss those to-die-for images because your batteries have gone dead. I use rechargeable battery packs with my cameras and rechargeable AA’s with my flashes.
First things first, the electrical voltage in many countries is 220V (versus 110V in the US). Make sure your battery charger accepts the correct voltage (today most are rated for 100V-240V) or you will irreparably damage your charger. Many places you will visit do sell batteries, but DON’T count on it - bring your own. Use rechargeable’s and bring several sets so you can swap them when they run out. I suggest two sets for each camera. Most camps and hotels have electrical plug points either in the guest rooms or in the office - check with us to be sure for your itinerary. You always want to have a charged set PLUS a backup set for each game drive.
See our links page for
our source for batteries.
 Top Top
DIGITAL STORAGE / FILM
  DIGITAL
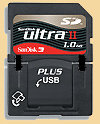
STORAGE: Digital images are initially stored onto removable digital flash media in your camera. For most cameras, this media is in the form of CompactFlash (CF) or Secure Digital (SD) memory cards. DIGITAL
STORAGE: Digital images are initially stored onto removable digital flash media in your camera. For most cameras, this media is in the form of CompactFlash (CF) or Secure Digital (SD) memory cards.
How much digital storage to bring depends on several factors.
1. How many digital images you will make.
2. The size of the digital images (ie, how much storage space each
image takes). This is determined by your camera settings (ie, JPEG
Fine, JPEG medium, Raw, etc.)
3. Whether you will edit images (ie, delete shots you don't want)
during your trip.
How Many Memory Cards Will You Need?
Memory cards come is varying sizes (note that the physical size of the card is generally the same, but the digital storage size differs). CF cards are available in several denominations by Gigabyte (GB) of storage space (1 Gigabyte = 1,000 Megabytes). If your images are 12GB in size each and you use a 16GB CF card, then you will be able to take and store approximately 1,333 images (16,000 ÷ 12) on one 12GB CF card. At this point, the card is full and you’ll have to remove your memory card from your camera and put in an unused card before you can continue taking pictures (note that some cameras also have limited built-in storage).
If you plan to make more images than will fit on the sum total of all your memory card space, then you’ll need to bring along additional storage in the form of a laptop, external hard drive(s), or specialized digital storage device.
Additional Digital Storage
Bringing additional storage devices allows you to upload your digital images from the memory card to the storage device. Once the images are safely stored onto the storage device, the memory card can be re-formatted (erased) and subsequently re-used in your camera to store more images. This process is then repeated each time the memory card is full. In this way, your memory cards may be used more than once during your trip.
Commonly used digital storage devices
to consider (Each of the following storage devices involves bringing extra weight on your trip, so it is up to you which to use, but the advantage is that it reduces the number of memory cards you may need to purchase):
1. Laptop Computer - The advantages of bringing a laptop are that you can edit your images on the laptop’s screen and upload images onto the laptop’s hard drive (or portable hard drive - see #2 below). The disadvantage is that a laptop adds significantly to the amount of gear you are bringing along. You will also need to purchase a memory Card Reader device (USB and Firewire readers are available) to upload your images (Note that some newer laptops have built-in card readers). The card reader is plugged into your laptop and the memory card is inserted into the card reader. This allows you to copy images from the memory card to your laptop’s hard drive.
2. Portable Hard Drive - A portable hard drive is basically the same as the hard drive that exists inside a computer (usually 2.5-inch laptop-type hard drives are used for this portable variety), except that these drives are enclosed in a protective housing and have a power switch and data transfer ports (either USB, Firewire or Thunderbolt) so you can connect them to a computer.
The main advantage of portable hard drives are that they are compact (usually about 5.5” x 3.5” x 1”) and can hold LOTS of images (up to 2,000GB or more). The disadvantage is that you will require a computer in order to transfer images onto these drives. This is because they are simply hard drives; they do not have a card reader built in.
The fact that these drives require a computer to use them defeats their purpose for many, but if you are bringing a laptop, this will allow you to avoid filling up your laptop’s hard drive AND allow you to make backup copies of your images on two separate drives (highly recommended if at all possible in case one hard drive fails). This is the data storage option I use.
My
photo equipment for African Safaris.
 3. Custom Storage
Device -
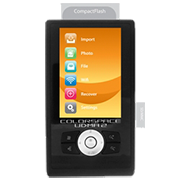
To meet the demands of the growing digital photography travel market, several new compact storage devices are available. In essence, this type of device is a portable hard drive with a built-in card reader. Some of the devices in this category include a viewing screen (usually 3 to 4 inches) so that you can use it to edit images. Keep in mind that images viewed on such a small screen may be difficult to edit critically. Other devices in this category include the built-in card reader, but not the viewing screen. These custom storage devices may be the perfect answer for those who want additional data storage without having to carry a laptop. 3. Custom Storage
Device -
To meet the demands of the growing digital photography travel market, several new compact storage devices are available. In essence, this type of device is a portable hard drive with a built-in card reader. Some of the devices in this category include a viewing screen (usually 3 to 4 inches) so that you can use it to edit images. Keep in mind that images viewed on such a small screen may be difficult to edit critically. Other devices in this category include the built-in card reader, but not the viewing screen. These custom storage devices may be the perfect answer for those who want additional data storage without having to carry a laptop.
I can recommend the following products
in this category:
Sanho HyperDrive ColorSpace UDMA2 Storage Viewers. The HyperDrive storage devices include 3.5-inch (480 x 320 pixel) QVGA color LCD screens and comes in several models with storage capacities up to 1TB. They accept Compact Flash (CF), Secure Digital (SD, SDHC, SDXC and MMC. Power comes from a rechargeable Lithium Ion battery. The HyperDrives will read JPEGs and Raw files (Canon, Nikon, Olympus, Panasonic and Pentax) and also include a wireless adapter, allowing the hard drive contents to be accessible from iOS, Android, any WiFi capable device or an FTP client. The HyperDrive also connects to your computer using a USB interface. Included software will recover lost or accidentally deleted photos from memory cards.
Nexto DI Storage Viewers. The Nexto DI models support hard drives up to 2TB. The Nexto can connect to your computer using USB and Firewire 800. The built-in 3-in-1 memory card slot accepts CF, SD, SDHC and SDXC card types. It uses a rechargeable Lithium Poly battery. |
Top
DIGITAL ISO
Digital ISO has replaced film speed, with the advantage that one can change ISO speeds at any time. The same basic principles apply as did with film, in that the slower ISO speeds generally produce images with less noise (artifacts or other aberrations in the image) at the expense of having to use slower shutter speeds (which may lead to unsharp images).
Regarding ISO on digital cameras:
Generally speaking, as you increase the ISO, you’ll find that the image colors tend to lose a bit of their saturation (i.e., get “duller”) and contrast is lowered. At the extreme, it can result in the equivalent of a 2-bit or higher reduction in individual color values, which is easily seen in images. Note however that the top camera companies are using image sensors which are more and more accurate (less noise) at higher and higher ISO’s. For example, the top-end cameras from Nikon and Canon are to produce extremely accurate and low-noise images at ISO’s up to 2000 and above.
Here’s how ISO values are created:
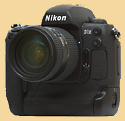
My current camera (the Nikon D4) uses a “native” ISO of 100 (it’s the lowest ISO setting on the camera). All ISO values above 100 are created by amplifying the image data coming into the Analog-to-Digital (ADC) converter. In other words, the sensor always works at the 100 sensitivity, but underexposed data values coming from the photosites (on the sensor) are boosted by an amplifier to produce higher ISO values. This means that minor differences in the light values received between the many photosites on the sensor get magnified and may become visible (creating “noise”).
Further explanation:
Imagine taking a picture and let’s focus only on two adjacent photosites on your camera’s digital sensor. Next imagine that the tiny part of detail in your image that is captured by these two neighboring photosites is 195 light photons by the first and 200 photons by the other. This difference is insignificant when these are near-black or very dark values and end up getting interpolated by your camera’s software into, say, a pixel value of 12,12,12 (ie, Red, Green, Blue color values) versus 12,13,12. But if these values are being amplified several times and they now represent middle gray instead of black or very dark, the difference may be significant (ie, 125,125,125 versus 125,135,125). This later difference in the pixel colors will likely be noticeable.
My ISO suggestions (to optimize image quality):
1. Use lower rather than higher ISO settings whenever possible (ie, such that you are able to get sharp images based on the light and lens combination), but remember that lower ISO means slower shutter speed and this can lead to unsharp or blurry images, so practice in different lighting and with stationary and moving subjects to see what works.
2. Expose
to the right (to the right refers to the right side of an image’s histogram). This means you should lean towards OVER-exposure without actually blowing out the important highlights completely (ie, making them go 100% white, with no edge detail at all) rather than under-exposure.
Here’s the reason why: There is more image data captured in the highlights than in the shadows and if you under-expose, you are losing information.
Digital camera sensors capture light in a linear fashion. Our eyes do not. A scene with twice the number of photons reaching the camera’s sensor appears twice as bright; with our human eyes, this scene appears brighter, but not nearly twice as bright. If it did, we’d experience overload when we move from shade to bright sunlight. Thus, our eyes see light in a non-linear way... (note this is what a gamma curve is intended to do - model human vision).
Most DSLR’s capture images using 12 bits (some now 14 bits) to encode the capture, producing 4,096 levels (2 to the 12th power) of tonality (from all black to pure white) and effectively capture 6 stops (like a f-stop on your camera) of dynamic range. With linear capture, this means that one-half of those levels (2,048) are devoted to the brightest stop, half the remainder (1,024) to the next brightest stop, half the remainder (512) to the next brightest stop and so on. In this scenario, the darkest stop, in the extreme shadows, is represented by only 64 levels or shades of dark grey. Thus, if you underexpose (to avoid blowing out highlights) you are wasting at least some of the image detail that the camera can capture (as the most detailed info is in the brightest stop).
To further illustrate, if you underexpose by just one stop, you are essentially wasting 2,048 bits of data and capturing only 2,048 (instead of 4,096). You are stretching only 2,048 bits across the histogram instead of 4,096... Thus, less digital information is captured than would have been if you had used proper exposure and therefore image quality is decreased.
3. ISO
800 is actually quite close to 100 in quality; so don’t
be afraid to use it. On my Nikon D4 camera, I use ISO 800 quite often just to make sure I have the extra shutter speed (to get tack-sharp images). On this camera, the slight increase in noise from 100 to 800 is very minor. Note that these numbers may be lower depending on your camera, but the way to judge is to take the same image using different ISO’s and find out where image quality starts to become noticeably degraded.
4. Use VERY HIGH ISO Only When You Really Need the Increased Shutter Speed, but expect a slight loss of color saturation and increased noise in large color blocks, such as skies. A properly exposed ISO 1600 image is far better than an underexposed image at ISO 400. Underexposure at very high ISO’s will definitely introduce substantial noise in the shadows that you would not find at lower ISO’s.
5. Using VERY HIGH ISO’s Will Likely Require Post-Processing Work to Eliminate the Noise. Although the newer pro-level cameras are achieving acceptable image quality at ISO 1600 and above, you may need to perform color correction, contrast adjustments and noise reduction when using very high ISO’s.
Top
IMAGE MAGNIFICATION / FIELD OF VIEW CROP
This topic may be a bit confusing, but important, especially if you are using a camera which does not have a “Full-frame sensor”.
Many of today’s digital SLR’s use an imaging chip (CCD or CMOS) that is about 40 percent smaller than a 35mm film frame (which measures 24x36mm). Nikon refers to its version of this smaller sensor as a DX sensor and I will use that terminology to represent all such smaller sensors in the following discussion. The result of DX sensors being used in a digital SLR is a “field of view crop” or lens magnification factor of 1.3 to 1.6 (depending upon the camera) times the focal length of the lens being used. I will not attempt to explain the physics of the reasons behind why this is true, but suffice it to say that the smaller sensors use only the center 2/3 portion of the image created by the lens.
Therefore, the effective focal length of the lens increases by this lens magnification factor when used on a digital SLR with a DX sensor. As an example, if you use an 70-200mm lens on a DX digital body with a 1.5 crop factor, the lens will have a field of view of 105-300mm and a 300mm lens on that same camera effectively becomes a 450mm lens and so on. The effective aperture (maximum f/stop) remains the same. The effective extra magnification can be either good or bad (if you want wide angle shots, the additional focal length is undesirable), depending on your needs.
Most wildlife photographers will benefit from additional focal length, since good quality telephoto lenses are both expensive and heavy to transport and we all wish we had a bit more magnification to get closer to our wild subjects.
A few final comments:
One less obvious benefit of all this is that since a digital sensor is capturing the center portion of the image, the image quality will (should) be better (all other things remaining equal) since camera lenses typically have better optical performance (sharpness and contrast) at their centers than at their outer edges.
For those photographers who would still like to be able to get those beautiful wide angle landscape or people shots, any additional focal length created by a DX sensor is not good. A 20mm ultra-wide lens becomes a not-so-wide 30mm lens. There are various ultra-wide zooms designed specifically for the smaller sensor cameras.
Finally, there are many cameras available (usually higher-end models) which offer a “full frame” digital sensor. These cameras have 24x36mm image sensors (the same size as a frame of 35mm film) without any field of view crop (focal length multiplier). Simply put, a 16-35mm lens on a “full-frame” digital SLR will provide a 16-35mm field of view.
GO
TO PAGE 2
(James' Equipment and James'
Software)
(Video
on Safari)
 |
Eyes
on Africa was selected most knowledgeable
Regional Expert for Southern Africa / Safaris by
National Geographic Traveler Magazine,
20th Anniversary Special Issue. |
Top
|