Wildlife and Safari Photography Tips
Page 2 of 2
The advent of digital photography has resulted in many more amateur photographers than ever before and today anyone with a smart phone has a camera with them most of the time. That said, most people are aware that a camera phone or an inexpensive point-and-shoot is not going to give them the quality images they are hoping to get on a nature or wildlife-based travel adventure.
The camera market is also flooded with an abundance of models, some with removable lenses, some with built-in zoom lenses, some big and heavy, some easy to carry and light-weight, some uber-expensive and some very affordable, but which one should you choose? The question really is which camera will be best for your trip and hopefully also be something you reach for often after you get home or at least on future trips.
Below are a few things to consider when choosing which photographic equipment to bring on your trip and we hope it will assist you in making decisions about new purchases.
Shortcut
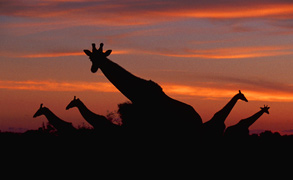
to African Safari Photos: Click
the shortcut link to go straight to our African safari photos.
EXCLUSIVE
Check out our new Digital
Photography Safari Workshops
 GO
TO PAGE 1 GO
TO PAGE 1
(Camera Lenses and Field of View Crop)
(Digital Storage and Digital
ISO)
FLASH
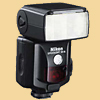 If you have a camera which accepts an off camera flash, you might want it for fill flash in some cases to add catch-light to an animal’s eyes or for evening and night drives. I am not a big practitioner of using flash for wildlife images. Making an aesthetically pleasing flash image of a wild animal is not easy. Use the flash if your camera has one, but use it primarily for fill flash, especially for people in shadow and close objects set against a bright background. Use of a flash for anything other than very close subject matter is usually futile - it won’t work well. You’ll want a fresnel lens flash-extender for your flash if you want to throw the light any distance at all. If you have a camera which accepts an off camera flash, you might want it for fill flash in some cases to add catch-light to an animal’s eyes or for evening and night drives. I am not a big practitioner of using flash for wildlife images. Making an aesthetically pleasing flash image of a wild animal is not easy. Use the flash if your camera has one, but use it primarily for fill flash, especially for people in shadow and close objects set against a bright background. Use of a flash for anything other than very close subject matter is usually futile - it won’t work well. You’ll want a fresnel lens flash-extender for your flash if you want to throw the light any distance at all.
One more note on flashes - If you’re serious about using a removable flash, consider purchasing a flash cord (I have one that stretches to about 3 feet) so that you can avoid having the flash point directly in line with the lens. Holding the flash at an angle to the animal’s eyes (different than the angle of your camera lens), especially in low light where reflections from their eyes will be more pronounced, will help reduce noticeable reflections. |
 BINOCULARS BINOCULARS
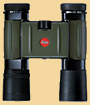
Bring them! These are, in my mind, mandatory. Believe me — you will use them. Every person should really have their own pair, but at a minimum, have a pair between you and your traveling companion if you have one. A small pair will suffice. I use a pair of Leica 10x25’s and they are great. They are also relatively small.
What do these
numbers mean?
Binocular size is expressed by two numbers, for example 8x42. The first number is the magnification (or power); the second is the aperture, which refers to the diameter of the objective lens in milli-meters. Therefore, 8x42 binoculars provide 8x magnification and have a 42mm objective lens. Remember that when it comes to binoculars, bigger isn’t always better. The higher the magnification, the heavier the binoculars are and the more hand movement and the shakier the image will be — just like with large camera lenses, smaller binoculars are easier to hand hold effectively.
How much magnification and aperture
do you need?
When you increase binocular magnification you decrease brightness and field of view. I find that the 10x pair I have are more than sufficient for most travel. The same rules apply here as with camera lenses in that carrying a large pair and holding them steady is not so easy — I find that a compact pair with good optics makes more sense than spending for and lugging a larger pair with added magnification (unless you are on a birding trip). As for field of view, the greater the aperture, the brighter the image will be, but also the greater the size, weight and cost. Again, the smaller compact size of the 25mm pair provide plenty of view for my taste.
What is the difference between porro-prism and roof prism binoculars?
Porro-prisms have objective lenses that are spaced farther apart than the eyepieces. Porro-prisms are bulky but usually perform better and cost less than roof-prisms. Also, porros yield a better three-dimensional image. Roof-prisms dominate the consumer market. The objective lenses line up directly with the eyepieces, resulting in a streamlined, compact and lightweight binocular. But roof-prisms usually cost more and lose more light to reflection, which is a disadvantage for astronomers but not for daytime terrestrial viewing.
What about coatings?
Coatings reduce the amount of light reflecting off of the lens and allow more light to reach your eyes. Without coatings, up to 50% of the light entering the binoculars is lost to reflections from the many glass surfaces within.
A note
on how they work
A binocular combines an image seen by both eyes into a single image. Binoculars are basically two telescopes mounted side by side. At the front of each telescope is a lens. Each lens gathers light from the image you’re observing. The objective or lens magnifies the image upside-down. If you’re using the most popular type of binoculars, prism binoculars, a prism in each tube turns the image right-side-up again. With field binoculars, a second lens in the tube functions essentially the same way as a prism, and inverts the image so it appears right-side-up. The light then travels down the tube and into each eyepiece and you see the image. |
 Top Top
VIDEO PHOTOGRAPHY
A video of your travel experience is also a great way to keep the memories lasting and more and more people are capturing video. Like the world of still photography, video has gone digital as well and almost all cameras on the market today now offer a video mode. In fact, many of the advancements in newly announced digital cameras are in the video realm (ie, better autofocus and better image quality in video).
Here are some things to consider when it comes to video:
Video Using a Digital SLR (DSLR) Camera
Most DSLR cameras now offer video recording modes in high definition. High definition refers to any video system of higher resolution than standard definition (SD). Resolution is typically measured using the number of horizontal lines in the image. Cameras that offer HD video record in either 720p (720 lines of resolution) or 1080i (1080 lines of resolution). Each format delivers a 16:9 wide screen aspect ratio. There is some debate over which format is better, but either is better than SD. The “i” in 1080i refers to an interlaced format. Basically, each frame that you see in this format is split into two half-frames of 540 lines that flash an instant before the next 540 lines are seen. This is all done so quickly (usually at 1⁄60 of a second for each half-frame) that the human eye doesn’t recognize the two separate fields. The “p” in 720p refers to progressive frames. This is the opposite scenario, where every frame contains all the information at once. Overall, both formats deliver incredibly sharp detail and you will not be able to see any difference between the two.
Data Storage
Video can eat up your camera’s storage space quickly if you shoot a lot of it, so make sure to consider this when calculating your storage needs. The emergence of new DSLR cameras which incorporate HD video capability has resulted in stagnation of the old camcorder market.
Video-capable DSLR’s are not full replacements for high-end professional-quality camcorders (some of which now record in 4K or four times standard HD), but they do offer several features not available on a consumer-level camcorder and they are even being used to record some TV shows and Indie films.
 Advantages of shooting video using a DSLR versus a Camcorder: Advantages of shooting video using a DSLR versus a Camcorder:
1) Your video camera is now built in to your still camera; this saves space in your camera bag and allows for quickly shooting a video clip without putting down your DSLR.
2) DSLR’s have larger sensors than all but the highest-end professional camcorders. What this means is better image quality (especially in low light and at higher ISO settings). The larger sensors also provide the ability to shoot video with a much shallower depth of field than a camcorder. This can be used to create a more cinematic look than video shot on a camcorder.
3) DSLR’s accept your entire range of lenses. Most consumer-level camcorders have a single zoom lens attached and it is not removable.
4) You can easily take a high-quality still image any time while shooting video with a DSLR merely by pressing the shutter button (albeit briefly disrupting the video recording).
Drawbacks of shooting video using a DSLR versus a Camcorder:
1) DSLR’s were designed as still cameras and aren’t as ergonomically suited to video shooting.
2) Camcorders offer smooth and silent power-zooming. This type of zoom action is nearly impossible to replicate on a DSLR (without external equipment).
3) Camcorders offer far better auto-focus capability during recording. This is a major downside of video recording on a DSLR. The mirror on a DSLR is locked in the up position during video recording and this means auto focus is only available via contrast-based AF (does not involve actual distance measurement at all and is generally slow). Manually focusing while trying to hold your DSLR and lens steady is not that easy. So essentially one has to lock focus on a subject and then start recording... Then if re-focus is needed (i.e. your subject has moved further away or closer to you), you have to stop recording, re-lock your focus and start recording again… not so good! Note however that contrast-based AF on DSLR’s is improving (mainly by offering image processors that permit faster contrast-based AF). Also the newer “mirrorless” Compact System Cameras offer full-time auto-fcous during video recording.
4) Sound recording on a DSLR is typically far inferior to that on a camcorder. The built-in microphone on a DSLR will often record sounds inside the camera (like the autofocus motor) and is sometimes located on the back side of the camera.
5) Camcorders offer built-in neutral density filters, which helps to obtain proper exposures shooting at wide apertures, even in bright sunlight.
All things considered, the video capabilities on today’s DSLR’s are very good and should continue to improve over the coming years. If you plan on using your DSLR to take video, I suggest you try using it before you travel, so you can get the most out of it while on your trip. |
Top
JAMES'
EQUIPMENT
Quite a few people ask me about my photography equipment. What do I bring on a photo adventure? What lenses do I think they should buy?
Here is what I am using currently:
Cameras
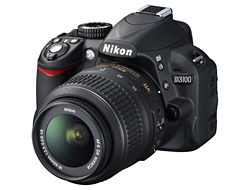
Nikon D4 and D3s Digital SLR Cameras. I currently shoot with a D4 and two D3s’s. The D4 is just a tad faster than the D3s (1 fps) but most importantly, the D4 image size is 16MP (versus 12MP for the D3s). The D4 also adds full HD video capability (1920x1080) while the D3s video is maxxed out at 1280x720. Both cameras offer superb image quality at high ISO’s. Like the D3s, the D4 has two memory card slots but instead of two CF cards, the D4 has one CF slot and one XQD slot. The D4 has some changes in its ergonomics and menu system as well, but essentially, in my opinion after lots of use, the D4 just feels faster all around.
Lenses
Nikon AF-S Nikkor 70-200mm f/2.8G ED VR II. I have used several variations of this lens over the years and, like the others, I couldn’t live without this lens. It is very versatile, very fast, and has great optics. If you shoot Nikon (or Canon), this one should be in your bag or at least on your wish list.
Nikon AF-S Nikkor 24-70mm f/2.8G ED. This lens is my workhorse at home with family, but is also great for semi-wide angle work in the field. A great lens for people shots and its zoom range makes this one a great lens for general travel as well.
Nikon AF-S Nikkor 14-24mm f/2.8G ED. A great lens for wide angle work, such as landscape and also superb for shots around the camps or in tight spaces. Arguably the finest wide-angle lens ever produced. The front glass is slightly spherical, so this lens does not accept any filters, so take care.
Nikon
AF-S VR Zoom-Nikkor 200-400mm f/4G IF-ED. Probably the best all-purpose wildlife lens available (except for the Canon version, which has a built-in 1.4x teleconverter). This lens is big and heavy, but the VR helps and it is the most usable lens I have ever used. It is very sharp, fast focusing and has a silent motor. The close focus range is almost unbelievable at just 6.2 feet.
Nikon AF-S Nikkor 600mm
f/4G ED VR. A big, heavy lens, but great for birds and other super telephoto work. Retains auto focus and good image quality with the 1.4x teleconverter attached.
Nikon TC-14E II AF-S Teleconverter. The latest version of Nikon’s teleconverter. I use the 1.4x regularly on my 600mm. I do not use a 1.7x nor 2x TC, as I feel that they cause too much image degradation.
Other Photo
Gear
Nikon SB-900 Autofocus Speedlight. Nikon’s latest version of external flash. This one is made for the new DSLR’s. As amazing as those in the past.
Really Right Stuff Camera Plates. Tripod mounting plates to make quick release a no-brainer. I have them on all my big lenses, plus on my cameras for wide angle work. Incredibly precise and finely engineered. Without peer.
Really Right Stuff TVC-33 Tripod. Carbon Fiber construction. Strong and super light-weight. I use this with my 600mm lens primarily. One of the finest pieces of craftsmanship I have ever owned.
Wimberley Version II Tripod Head with Quick Release. This is a precision gimbal-style instrument and is attached to my tripod at all times. Strong enough for the 600mm. I like it much more than the ballhead systems that are also widely used. The Wimberley requires Arca-Swiss plates be attached to your lens. I have the Wimberley replacement lens foot for my 600mm and it works perfectly with the quick release function in this head. If you set it up properly, the lens will stay in whichever tilt angle position you move it to and balances perfectly. Amazing construction.
Camera Bags
Here’s how I transport my gear when I travel and also when on wildlife viewing game drives or walks.
Pelican 1620 Watertight Roller Case w/foam. Pelican make superb hard cases for transporting camera equipment and I have used this one for many years. Other than some cosmetic scratches and dings (thanks to luggage handlers I suspect), it remains in good shape even with so much international travel. I removed the middle foam layers and left in one layer on top and bottom only. My Gura Gear 30L (see below) fits inside the Pelican perfectly and I secure the Pelican with TSA-type locks. It remains in my room once I arrive at a camp and only the Gura Gear bags go onto the game drive vehicle with me.
Gura Gear Kiboko 30L. I love the Gura Gear line of camera bags. This one opens with a butterfly-type configuration allowing me into both sides quickly and easily. For international flights, it holds my 600mm f/4 and 200-400mm f/4, plus other lenses and/or camera bodies and other miscellaneous items. Once packed, I put it inside the Pelican and into checked baggage. Note that this bag has been replaced by the newer Bataflae 32L bag.
Gura Gear Chobe 19-24L. This is my carry-on bag for air travel to my various destinations. It holds my 70-200mm lens, two camera bodies, portable hard drives, flash, and many other items as well. It’s heavy when loaded up, but I use a portable fold-up pull cart to carry it through airports and both items fit into overhead easily. This bag accompanies me on game drives as well. This is an incredibly durable and well built piece of luggage and I recommend it heartily.
Tamrac
Velocity 9x - Pro Sling Pack. I purchased this bag to use as a “walking around” bag for Cape Town or on birding trips or outings where I know I will need to do some walking. The bag has only one shoulder strap, but it can be carried like a sling over one shoulder or with the waist belt attached, in which case it essentially functions like a proper back pack. I typically pack the bag with 1 camera, 70-200mm and 24-70mm lenses, and the SB-900 flash.
Binoculars
Leica Trinovid 10 x 25 BC/BCA. A guide let me use his back in 1996 in Botswana and I couldn’t believe how much better they were than my Nikon’s of the same size. These Leica’s are superb, especially in low light situations, but their biggest advantage is that they fold up and fit into a shirt pocket.
Computer Equipment
I use Apple for my personal and professional computer
systems.
Apple Mac Pro 3.33 GHz 6-Core Intel Xeon. I purchased this machine specifically to be a robust Photoshop computer. I purchased the most stripped down version available from Apple, then upgraded it with 32 GB’s of RAM, a 240-GB Solid State Boot drive (which contains my applications and system files), two 2-TB data drives (one for my data and the second one cloned daily as a backup), and a 1-TB backup drive which contains a clone of the SSD boot drive backed up nightly. The design of this machine is lovely and adding hard drives, PCI cards and RAM is so easy that a complete novice can do it without much difficulty.
NEC 30-inch MultiSync Monitor. A large monitor like this makes a significant difference when working in graphics applications and also when working simultaneously in multiple applications. This monitor has an amazing native resolution of 2560 x 1600 pixels. Another nice feature is the tilt/swivel/pivot/height-adjust stand; something that really makes positioning this huge display a charm.
Apple 15-inch MacBook Pro with Retina display. My travel computer. This laptop has 16GB of RAM and a 756-GB of Flash Storage. The Flash Storage (like the cards used in your camera) has no moving parts (unlike traditional hard disc drives) and is therefore more durable and less likely to malfunction due to being bumped or jostled during travel. Flash Storage (sometimes called a Solid State Drive or SSD) is much more expensive than a traditional hard drive, but far faster. I use this laptop when I’m traveling and also around the house when I’m not in my office.
Image Storage
DroboPro. The DroboPro from Data Robotics is a self-managed business class hard drive storage array that uses the revolutionary BeyondRAID™ technology. The DroboPro accommodates up to 8 3.5-inch SATA hard drives (the standard Drobo accepts 4 drives) and offers you a choice of single and dual disk redundancy combined with instant capacity expansion (by either adding another drive to an empty bay or replacing an existing drive with a larger capacity drive). Single disk redundancy means that if one of the drives in the Drobo fails, no files are lost and you simply replace the bad drive with a new drive. If you choose to use the Dual disk redundancy option (as I do), then you are protected against the simultaneous failure of up to two of the hard disks in your Drobo.
Adding or replacing a drive could not be easier, as you simply push down the release and remove the old drive and push in the new drive until it clicks. That’s it. Drobo will format the new drive and automatically restore your files to the redundancy option you have selected. The drives can be of any capacity. I use 2- or 3-TB Western Digital Caviar Green drives (they have reduced power consumption and run cooler). The Drobo Dashboard software makes managing your data simple and painless. The Drobo can connect to your computer via a choice of three interfaces: iSCSI (utilizes Gigabit Ethernet), FireWire 800, and Hi-Speed USB 2.0.
OWC
Mercury On-the-Go 1TB & 2TB Firewire 800 Portable Hard Drives. I use these portable hard drives when I’m traveling to store two copies of each image I make. Lots of storage in a very well put together package. Fast Firewire 800 data transfer speeds.
Sandisk 32GB and 64GB Extreme Pro Flash Cards. The Extreme Pro CF Cards are fast and I have not yet had any problems. Raw images from the Nikon D3s are about 14MB in size (and 1/3 larger for the D4), so I typically get around 1,400-2,000 images per 32GB card. Since the D3s and D4 both have two card slots, I use a 32GB and 64GB together, providing me 96GB of storage for each camera.
Top
JAMES'
SOFTWARE
Following is a list and some commentary on the different software I use in conjunction with my photographic images.
Image Editing
Adobe Lightroom 5. Since I shoot entirely in Raw mode, I use Adobe’s Lightroom to do all my cropping and adjustments to exposure, white balance (color temperature and tint), and for noise removal. Really a masterful piece of software and it works with all proprietary raw formats. Lightroom can perform white balance and tone mapping adjustments to an image with no loss of the original data (the digital negative); something that is not possible using Photoshop. By cropping in Lightroom, I do not lose any pixels from the original image.
Adobe Photoshop CC. The standard image editing program used by nearly all professionals. I use Photoshop if I want to do more creative work on an image, but Lightroom is my primary image editor.
Digital Asset
Management
Adobe Bridge. Part of Adobe’s Photoshop CS5 software, this is my tool for performing all initial edits (ie, deletes) of my images. I use this software essentially as a combination file browser and virtual light table for images (it can load and read all types of Raw files using Adobe Camera Raw). It’s the first stop in my digital workflow.
Bridge is highly configurable and you can save various different viewing layouts including thumbnail and preview sizes, metadata views, a multitude of sorting criteria, background colors, etc. I use Bridge to strip out throwaways, perform batch processes (such as renaming my files for easy ID based on the trip or project), and also to add metadata such as copyright, keywords, descriptions and my contact information. Certainly one of the most used software programs on my computer.
Adobe DNG Converter. Adobe’s DNG (Digital Negative) Converter software is used to convert my Nikon Raw files to Adobe DNG files. I do this format conversion primarily to provide long-term insurance against file format obsolescence because, unlike proprietary raw formats, the DNG format is an open, documented format whose file spec is readily available. Also, because proprietary raw formats are undocumented, Adobe treats them as read-only files and adds a sidecar file (XMP file) or creates a separate database to store each image’s metadata, such as copyright, keywords, etc. Since DNG is a documented format, it’s safe to write the metadata directly into the DNG file itself, thus simplifying my workflow. I do not use Nikon’s software for browsing nor editing of my images, but if you do use your camera’s software at all, then DNG is not a good idea for you. The only downside is that it takes time to do the conversion.
Have more questions? Feel free to call us
and we'll answer all your concerns with regards to cameras, digital
media, computers, software, etc.
GO
TO PAGE 1
(Camera Lenses and Field of View Crop)
(Digital Storage and Digital ISO)
 |
Eyes
on Africa was selected most knowledgeable
Regional Expert for Southern Africa / Safaris by
National Geographic Traveler Magazine,
20th Anniversary Special Issue. |
Top
|